微信小程序 Mega プラグインサンプルプロジェクト説明
この記事では、サンプルプロジェクトが提示する各機能の使用方法、実装方法、および注意事項について詳細に説明します。
始める前に
- [Unity エディタを使用した注釈の作成とアップロード](./content-annotation-creation.md)が可能であり、注釈名とその ID を記録していること。
- [実空間と位置を合わせた 3D コンテンツを Unity エディタで作成](./content-realworld-alignment.md)できること。
- [サンプルプロジェクトを完全に実行](./fullstart.md)できること。
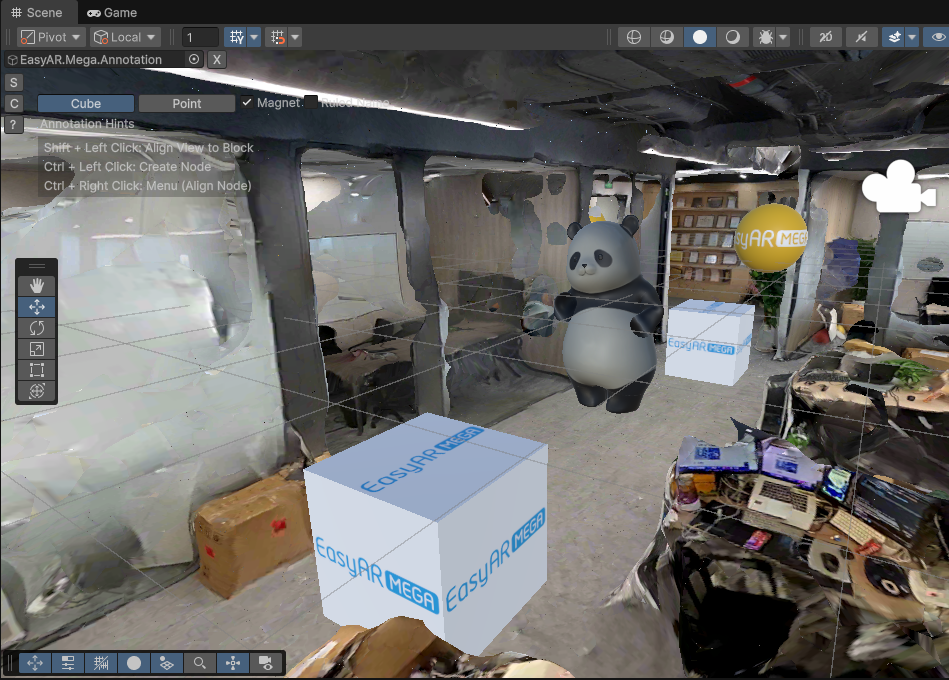
注釈位置にモデルを表示する方法
Unityエディタで正確に配置しアップロードしたアノテーションを記録、アノテーション名とIDを記録
GLTFモデルアセットの追加
miniprogram/components/sample-easyar-mega/index.ts内のsampleAssetsにモデルアセットを追加します。const sampleAssets = { your_model_name: { assetId: "your_model_asset_id", type: "gltf", src: "url/model.glb", options: {} } }追加したモデルアセットのロード
miniprogram/components/sample-easyar-mega/index.ts内のloadAsset()関数でモデルをロードします。async loadAsset() { try { await scene.assets.loadAsset(sampleAssets.your_model_name); } catch (err) { console.error(`Failed to load assets: ${err.message}`); } }置換対象アノテーションの設定
miniprogram/components/sample-data/annotation-metadata.tsで置換対象のアノテーションを設定します。複数置換する場合はカンマで区切ります。export const AnnotationMetaData: Record<string, any> = { "aaaaaaaa-bbbb-cccc-dddd-123456789012": { assetId: "panda", scale: "0.5 0.5 0.5" }, "aaaaaaaa-bbbb-cccc-dddd-123456789013": { assetId: "your_model_asset_id", scale: "1 1 1" } };アノテーションを置換してモデルをロード
EMAロードのコールバックでxr-frameの「ファクトリメソッド」
scene.createElement(xrFrameSystem.XRGLTF, options)を使用してモデルノードを作成します。パラメータ:
xrFrameSystem.XRGLTF: 作成する要素タイプをGLTFモデルに指定。options: 初期化設定項目。コンポーネントの属性に対応。
コード内の主要属性:
"model": 必須。ロード済みリソースID(asset-id)を指定。"anim-autoplay": オプション。ロード後に自動再生するアニメーション名を指定。"scale": オプション。assetInfo.scaleまたは"1 1 1"。name: 必須。アノテーション名。
注意
属性Keyの文字列/非文字列を厳密に区別し、例示通りに記述してください。
モデルをアノテーションノード下にマウント
xrNode.addChild(child)。GLTFモデルが異なるプラットフォームのローダーで同一の結果を表示するため、ロード後のモデルをY軸中心に180度回転させる必要があります。
if (assetInfo && assetInfo.assetId && assetInfo.assetId.trim().length > 0) {
    model = scene.createElement(
        xrFrameSystem.XRGLTF,
        {
            /** 前ステップのassetIdを指定 */
            "model": assetInfo.assetId,
            /** モデルアニメーションを指定可能 */
            "anim-autoplay": assetInfo.animation ? assetInfo.animation : "",
            "scale": assetInfo.scale ? assetInfo.scale : "1 1 1",
            name: emaName
        }
    );
    xrNode.addChild(model);
    /**
     * xr-frame上のモデル向きをUnityのレンダリング結果と完全一致させるため
     * ロード後のモデルをY軸中心に180度回転
     */
    let modelTransform = model.getComponent(xrFrameSystem.Transform);
    let currentRotation = modelTransform.quaternion.clone();
    let targetRotation = currentRotation.multiply(new xrFrameSystem.Quaternion().setValue(0, 1, 0, 0));
    modelTransform.quaternion.set(targetRotation);
}
実機実行
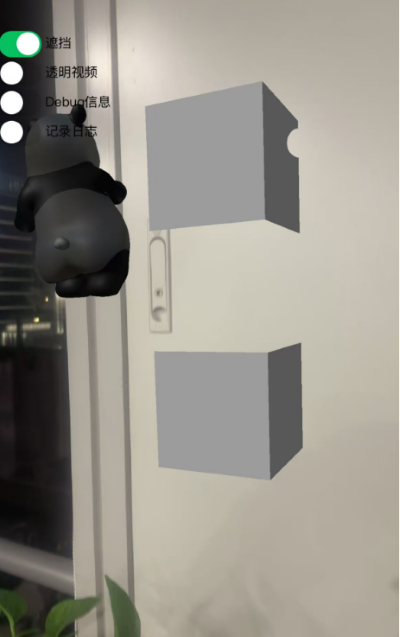
実機実行結果(ステップ1のUnityエディタ上の位置と比較可能):
左側の透明動画ボタンを有効化: ワールド座標原点(
(0, 0, 0))に透明動画素材の立方体が表示。注記
原点位置は空間内の任意の場所です。アノテーションを使用して遮蔽モデルを配置可能(詳細はUnityエディタでのアノテーション作成参照)。
左側の遮蔽ボタンを有効化: ワールド座標原点(
(0, 0, 0))にパンダモデルと積層立方体が表示。中央の立方体は遮蔽素材、反対側には遮蔽素材の静的パンダモデル。注記
原点位置は空間内の任意の場所です。アノテーションを使用して遮蔽モデルを配置可能(詳細はUnityエディタでのアノテーション作成参照)。
注釈位置で透明動画を再生する方法
video-texture タイプの動画リソースをロード。
async loadAsset() {
    const videoTexture = {
        assetId: "fireball",
        type: "video-texture",
        // 動画リソース URL
        src: "url/video-resource.mp4",
        options: {
            autoPlay: true,
            loop: true,
        }
    };
    try {
        // video-texture タイプのリソースをロード
        await scene.assets.loadAsset(videoTexture);
    } catch (err) {
        console.error(`Failed to load video texture: ${err.message}`);
    }
}
Modify EMA load callback
EMAロードのコールバックで
scene.createElement(xrFrameSystem.XRMesh,options)を使用し、シンプルなジオメトリを作成してeasyar-video-tsbsマテリアルを割り当て、uniformをu_baseColorMap:video-{$assetId}に変更。パラメータ:
xrFrameSystem.XRMesh:作成する要素タイプを基本ジオメトリに指定。options:初期化設定項目。コンポーネントの属性に対応。
コード内の主要属性:
"geometry": "cube":xr-frame 組み込みの立方体ジオメトリデータを使用。"material": "easyar-video-tsbs":事前定義されたマテリアルを指定(命名から推測。動画テクスチャ対応の特殊マテリアル)。"uniforms": "u_baseColorMap:video-{$assetId}":
注意
属性 Key の文字列と非文字列を区別すること。例示の形式で正確に記入。
これはマテリアルパラメータの動的バインディング。
video-{$assetId}という動画リソース(テクスチャ)をマテリアルのベースカラーマップにマッピング。効果:表面で動画が再生される立方体が生成される。
model = scene.createElement(xrFrameSystem.XRMesh, {
    geometry: "cube",
    material: "easyar-video-tsbs",
    uniforms: "u_baseColorMap:video-fireball",
});
xrNode.addChild(model);
注記
video-texture使用時にコンソールにwx.createVideoDecoder with type: 'wemedia' is deprecated警告が表示される場合、無視してください。WeChat公式チーム確認済み。この警告は機能に影響しません。
Real machine operation
空間と整合する遮蔽モデルを配置する方法
正確な配置で遮蔽用モデルを配置し、アノテーションをアップロードする。
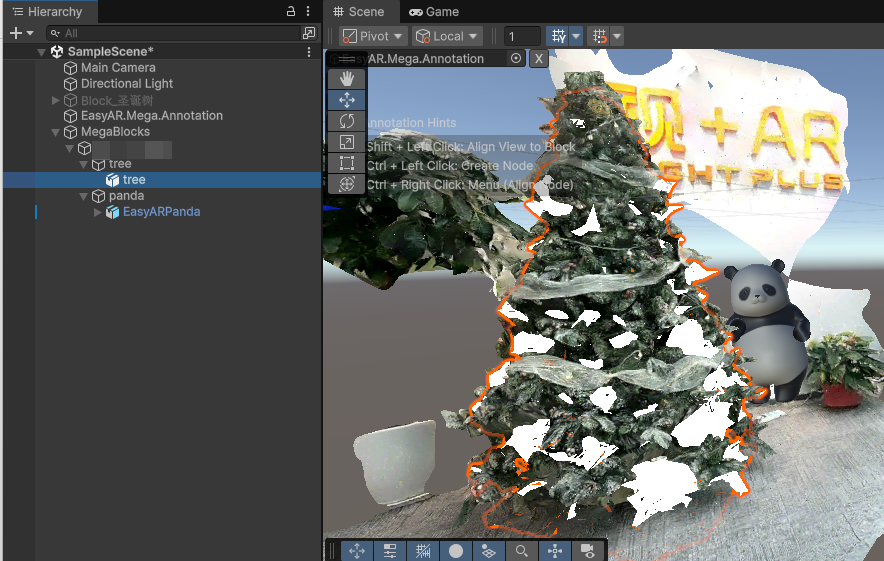
xr-frame ミニアプリで遮蔽用GLTFをロードする
モデルアセットを
scene.assets.loadAsset()でロード(手動でのアンロードが必要)。const sampleAssets = { occlusion1: { assetId: "occlusion1", type: "gltf", src: "url/occlusion1.glb", options: {} } } async loadAsset() { if (!scene) {console.error("Empty scene"); return;} try { await scene.assets.loadAsset(sampleAssets.occlusion1); } catch (err) { console.error(`Failed to load assets: ${err.message}`); } }ランタイム時にEMAロードコールバック内でモデルをロードし遮蔽マテリアルを適用する
EMAロードコールバック内で
scene.createElement(xrFrameSystem.XRGLTF,options)を使用しモデルノードを作成。パラメータ:
xrFrameSystem.XRGLTF: 作成する要素タイプをGLTFモデルに指定。options: 初期化設定オプション、コンポーネントのプロパティに対応。
コード内の主要プロパティ:
"model": 必須、ロード済みリソースID(asset-id)を指定。"scale": オプションassetInfo.scaleまたは "1 1 1"。name: 必須、アノテーション名。
注意
プロパティKeyの文字列/非文字列を区別し、例示通り正確に入力すること。
モデルをアノテーションノード下にマウント
xrNode.addChild(child)。プラットフォーム間のGLTFローダー差異を均一化するため、ロード後のモデルをY軸周りに180度回転させる必要がある。
最終的に
model.getComponent(xrFrameSystem.GLTF).meshes.forEach((m: any) => {m.setData({ neverCull: true, material: occlusionMaterial });}でGLTFモデルのマテリアルを変更。注記
easyar-occulusionマテリアルのロード、登録、登録解除、アンロードはAR Sessionが制御。アノテーション位置でモデルを遮蔽として使用:
if (...) {
    model = scene.createElement(
        xrFrameSystem.XRGLTF,
        {
            "model": assetInfo.assetId,
            "scale": assetInfo.scale ? assetInfo.scale : "1 1 1",
            name: emaName
        }
    );
    /**
    * GLTFローダーの挙動差異を補正し、xr-frame上でのモデル向きをUnityのレンダリング結果と完全一致させるため
    * ロード後のモデルをY軸周りに180度回転させる必要がある場合がある
    */
    let modelTransform = model.getComponent(xrFrameSystem.Transform);
    let currentRotation = modelTransform.quaternion.clone();
    let targetRotation = currentRotation.multiply(new xrFrameSystem.Quaternion().setValue(0, 1, 0, 0));
    modelTransform.quaternion.set(targetRotation);
    //Transform変更後に必ずマテリアルを変更すること
    if (assetInfo.assetId == 'occlusion1') {
        //megaプラグイン提供の遮蔽マテリアルを取得
        let occlusionMaterial = scene.assets.getAsset("material", "easyar-occlusion");
        //遮蔽マテリアルを適用
        model.getComponent(xrFrameSystem.GLTF).meshes.forEach((m: any) => {
            m.setData({ neverCull: true, material: occlusionMaterial });
        });
    }
}
実機実行
Unityエディタ上でのシミュレーション結果と比較可能。