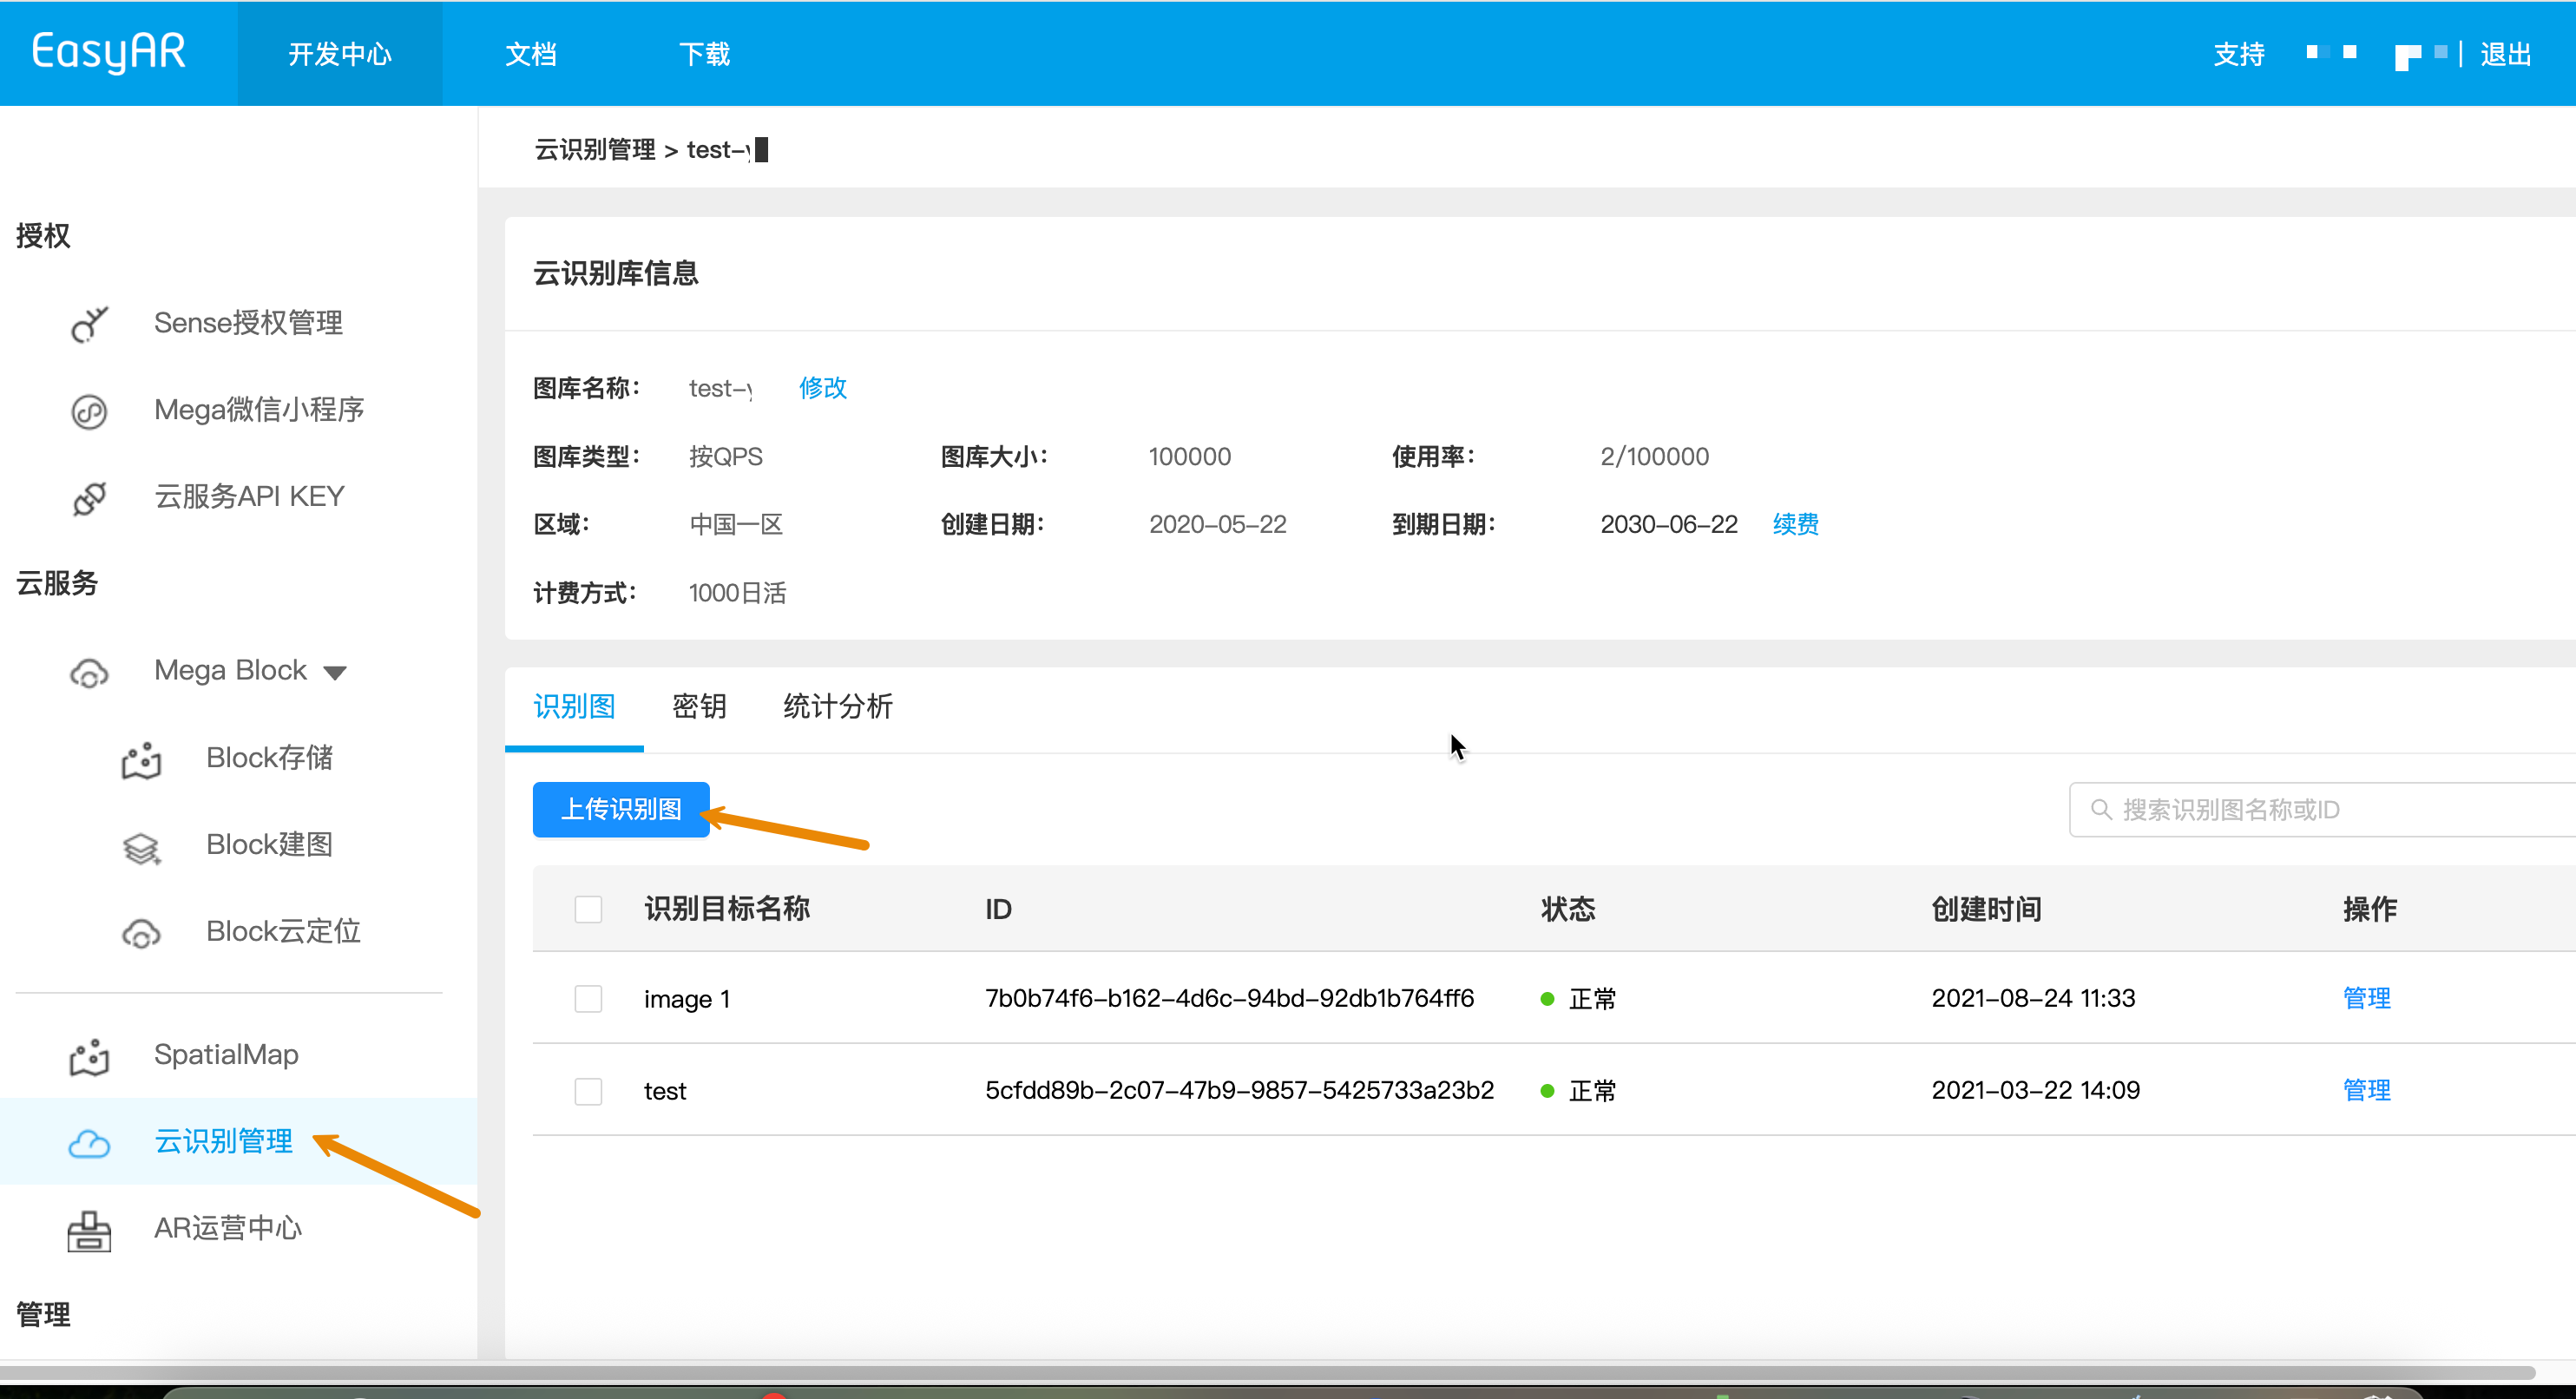
Untuk memastikan stabilitas dan akurasi AR recognition, disarankan mengupload image yang kaya texture, memiliki feature point yang jelas, dan tidak memiliki area blur.
Di lingkungan production, kami sangat menyarankan developer mengikuti metode tiga langkah berikut untuk mengelola target image secara otomatis melalui API, bukan langsung memaksa upload.
Sebelum menambahkan secara resmi, periksa terlebih dahulu apakah image library saat ini sudah memiliki target yang sama atau sangat mirip.
Gunakan algoritme untuk memprediksi apakah image cocok sebagai recognition target image.
Setelah melewati dua pemeriksaan di atas, Anda dapat melakukan upload dengan aman.
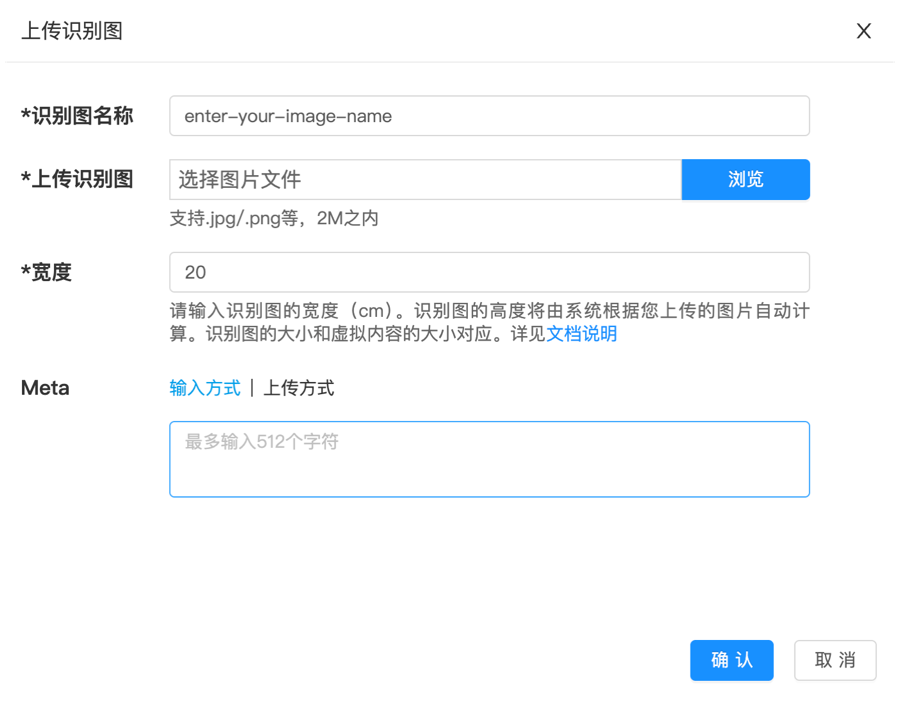
Berlaku untuk tahap verifikasi atau pemeliharaan sedikit target image. Console manajemen Web menggunakan mode "force create", tidak otomatis melakukan similarity check, dan tidak memeriksa apakah image dapat dikenali.
Jika perlu manajemen skala besar atau integrasi ke backend sendiri, gunakan Web Service REST API untuk pembuatan otomatis.
- Pertama, konversi gambar target lokal ke Base64 (macOS / Linux), dan simpan hasilnya ke image_base64.txt.
base64 -i ./target.jpg | tr -d '\n' > image_base64.txt
- Ganti placeholder dengan parameter sebenarnya dan jalankan skrip curl.
- Your-Server-side-URL -> host API sebenarnya
- Your-Token -> API Key Authorization Token sebenarnya
- Your-CRS-AppId -> appId Anda
- demo_target -> nama target
- size -> lebar gambar target (cm)
curl -X POST "https://<Your-Server-side-URL>/targets" \
  -H "Content-Type: application/json" \
  -H "Authorization: <YOUR-TOKEN>" \
  -d '{
    "appId": "<Your-CRS-AppId>",
    "image": "'"$(cat image_base64.txt)"'",
    "active": "1",
    "name": "demo_target",
    "size": "20",
    "type": "ImageTarget",
    "allowSimilar": "1"
  }'
Unduh kode sample Java
Impor project melalui Maven
Step 1. Buka file kode terkait CreateTarget.java
Step 2. Ubah variabel global dan ganti dengan parameter autentikasi dalam checklist persiapan Anda
- CRS AppId
- API Key / API Secret
- Server-end URL
- IMAGE_PATH: file target image yang akan diunggah
public class CreateTarget {

    private static final String TARGET_MGMT_URL = "http://cn1.crs.easyar.com:8888";
    private static final String CRS_APPID       = "--here is your CRS AppId--";
    private static final String API_KEY         = "--here is your API Key--";
    private static final String API_SECRET      = "--here is your API Secret--";
    private static final String IMAGE_PATH      = "test_target_image.jpg";

    public String create(Auth auth, String imgPath) throws IOException{
        byte[] image = Files.readAllBytes(Paths.get(imgPath));
        if(image.length > Common.MAXIMUM_SIZE) {
            System.err.println("maximum image size is 2MB");
            System.exit(-1);
        }
        JSONObject params = new JSONObject()
                .put("name", "java-sdk-test")
                .put("image", Base64.getEncoder().encodeToString(image))
                .put("type","ImageTarget")
                .put("size", "20")
                .put("meta", "Your customized meta info");
        RequestBody requestBody = FormBody.create(MediaType.parse("application/json; charset=utf-8"),
                Auth.signParam(params, auth.getAppId(), auth.getApiKey(), auth.getApiSecret()).toString());
        Request request = new Request.Builder()
                .url(auth.getCloudURL() + "/targets")
                .post(requestBody)
                .build();
        return new OkHttpClient.Builder().readTimeout(120,TimeUnit.SECONDS).build().newCall(request).execute().body().string();
    }

    public static void main(String[] args) throws IOException {
        Auth accessInfo  =  new Auth(CRS_APPID, API_KEY, API_SECRET, TARGET_MGMT_URL);
        JSONObject createResponse = new JSONObject(new CreateTarget().create(accessInfo, IMAGE_PATH)).getJSONObject(Common.KEY_RESULT);
        System.out.println("created target: "+ createResponse.getString(Common.KEY_TARGETID));
    }
}
Step 3. Jalankan Main
Unduh kode sample NodeJS.
Step 1. Konfigurasikan file key keys.json.
- CRS AppId
- API Key / API Secret
{
  "appId": "--here is your appId for CRS App Instance for SDK 4--",
  "apiKey": "--here is your api key which is create from website and which has crs permission--",
  "apiSecret": "--here is your api secret which is create from website--"
}
Step 2. Jalankan dengan menentukan gambar uji, file key, dan Server-end URL.
node bin/addTarget test.jpeg -t <Server-end-URL> -c keys.json
[Opsional] Kode parameter target image
Untuk logika penambahan target image, ubah file kode addTarget.js.
Edit parameter target image, seperti meta dan nama target image, sesuai struktur target anonim yang diteruskan ke metode createTarget.
var argv = require('yargs')
    .usage('Usage: $0 [image] -t [host] -c [keys]')
    .demand(1)
    .default('t', 'http://localhost:8888').alias('t', 'host')
    .default('c', 'keys.json').alias('c', 'keys')
    .help('h').alias('h', 'help')
    .epilog('copyright 2015, sightp.com')
    .argv;

var fs = require('fs');

var imageFn = argv._[0];
var host = argv.host;
var keys = JSON.parse(fs.readFileSync(argv.keys));

var farmer = require('../farmer')(host, keys.appKey, keys.appSecret);

farmer.createTarget({
    'image': fs.readFileSync(imageFn).toString('base64'),
    'name':'test2',
    'allowSimilar': '1',
    'active':'1',
    'size':'20',
    'type':'imageTarget'
})
.then(function(resp) {
    console.log(resp.result.targetId);
})
.fail(function(err) {
    console.log(err);
});
createTarget memanggil API layanan cloud. Kode sample ada di farmer.js.
function createTarget(target) {
    return Q.promise(function(resolve, reject) {
        request.post(host + '/targets')
        .send(signParams(target))
        .end(done(resolve, reject));
    });
}
Buat file kode terkait create_target.py, ubah variabel global, lalu jalankan
pip install requests
python create_target.py
import base64, hashlib, json, time, requests

APP_ID = "your_app_id"
API_KEY = "your_api_key"
API_SECRET = "your_api_secret"
IMAGE_PATH = "test.jpg"
API_HOST = "https://cn1-crs.easyar.com"

def sha256_hex(s: str) -> str:
    return hashlib.sha256(s.encode()).hexdigest()

image_b64 = base64.b64encode(open(IMAGE_PATH, "rb").read()).decode()
timestamp = int(time.time() * 1000)

sign_params = {
    "image": image_b64,
    "name": "demo_target",
    "size": "20",
    "meta": "",
    "type": "ImageTarget",
    "timestamp": timestamp,
    "appId": APP_ID,
    "apiKey": API_KEY
}

sign_str = "".join(f"{k}{sign_params[k]}" for k in sorted(sign_params)) + API_SECRET
print(sign_str)
signature = sha256_hex(sign_str)

body = dict(sign_params)
body["signature"] = signature

headers = {
    "Content-Type": "application/json",
    "appId": APP_ID
}

resp = requests.post(f"{API_HOST}/targets", headers=headers, json=body)
print(resp.text)
Unduh kode contoh PHP
Step 1. Buka kode masuk demo.php
Step 2. Ubah variabel global dan ganti dengan parameter autentikasi dalam daftar yang telah disiapkan
- CRS AppId
- API Key / API Secret
- Server-end URL
- imageFilePath : path file gambar target yang akan diunggah
<?php
include 'EasyARClientSdkCRS.php';
$apiKey = 'API Key';
$apiSecret = 'API Secret';
$crsAppId = 'CRS AppId'
$crsCloudUrl = 'https://cn1-crs.easyar.com';
$imageFilePath = '1.jpg'

$sdk = new EasyARClientSdkCRS($apiKey, $apiSecret, $crsAppId, $crsCloudUrl);

$params = [
  'name' => 'image 1',
  'active' => '1',
  'size' => '1',
  'meta' => base64_encode('hello world'),
  'image' => base64_encode(file_get_contents($imageFilePath)),
];

$rs = $sdk->targetAdd($params);
if ($rs->statusCode == 0) {
  print_r($rs->result);
} else {
  print_r($rs);
}
Step 3. Jalankan php demo.php
Cargo.toml:
[dependencies]
reqwest = { version = "0.11", features = ["json"] }
serde_json = "1"
sha2 = "0.10"
base64 = "0.21"
tokio = { version = "1", features = ["full"] }
main.rs:
use std::{fs, collections::BTreeMap};
use sha2::{Sha256, Digest};
use base64::Engine;
use reqwest::Client;
use std::time::{SystemTime, UNIX_EPOCH};

const APP_ID: &str = "your_app_id";
const API_KEY: &str = "your_api_key";
const API_SECRET: &str = "your_api_secret";
const IMAGE_PATH: &str = "test.jpg";
const API_HOST: &str = "https://cn1-crs.easyar.com";

fn sha256_hex(s: &str) -> String {
    let mut h = Sha256::new();
    h.update(s.as_bytes());
    format!("{:x}", h.finalize())
}

#[tokio::main]
async fn main() {
    let img = fs::read(IMAGE_PATH).unwrap();
    let image_b64 = base64::engine::general_purpose::STANDARD.encode(img);
    let timestamp = SystemTime::now()
        .duration_since(UNIX_EPOCH).unwrap()
        .as_millis();

    let mut sign = BTreeMap::new();
    sign.insert("image", image_b64);
    sign.insert("name", "demo_target".into());
    sign.insert("size", "20".into());
    sign.insert("meta", "".into());
    sign.insert("type", "ImageTarget".into());
    sign.insert("timestamp", timestamp.to_string());
    sign.insert("appId", APP_ID.into());
    sign.insert("apiKey", API_KEY.into());

    let mut raw = String::new();
    for (k, v) in &sign {
        raw.push_str(&format!("{}{}", k, v));
    }
    raw.push_str(API_SECRET);

    sign.insert("active", "1".into());
    sign.insert("signature", sha256_hex(&raw));

    let client = Client::new();
    let resp = client.post(format!("{}/targets", API_HOST))
        .header("Content-Type", "application/json")
        .header("appId", APP_ID)
        .json(&sign)
        .send().await.unwrap()
        .text().await.unwrap();

    println!("{}", resp);
}
cargo run
Buat file kode terkait main.go, ubah variabel global, lalu jalankan:
go run main.go
main.go:
package main

import (
  "bytes"
  "crypto/sha256"
  "encoding/base64"
  "encoding/json"
  "fmt"
  "os"
  "sort"
  "net/http"
  "time"
)

const (
  AppID     = "your_app_id"
  ApiKey    = "your_api_key"
  ApiSecret = "your_api_secret"
  ImagePath = "test.jpg"
  ApiHost   = "https://cn1-crs.easyar.com"
)

func sha256Hex(s string) string {
  sum := sha256.Sum256([]byte(s))
  return fmt.Sprintf("%x", sum)
}

func main() {
  img, _ := os.ReadFile(ImagePath)
  imageB64 := base64.StdEncoding.EncodeToString(img)
  timestamp := time.Now().UnixMilli()

  sign := map[string]string{
    "image":     imageB64,
    "name":      "demo_target",
    "size":      "20",
    "meta":      "",
    "type":      "ImageTarget",
    "timestamp": fmt.Sprint(timestamp),
    "appId":     AppID,
    "apiKey":    ApiKey,
  }

  keys := make([]string, 0, len(sign))
  for k := range sign { keys = append(keys, k) }
  sort.Strings(keys)

  builder := ""
  for _, k := range keys {
    builder += k + sign[k]
  }
  builder += ApiSecret

  signature := sha256Hex(builder)
  sign["signature"] = signature

  body, _ := json.Marshal(sign)

  req, _ := http.NewRequest("POST", ApiHost+"/targets", bytes.NewReader(body))
  req.Header.Set("Content-Type", "application/json")

  resp, _ := http.DefaultClient.Do(req)
  defer resp.Body.Close()

  buf := new(bytes.Buffer)
  buf.ReadFrom(resp.Body)
  fmt.Println(buf.String())
}
Buat proyek konsol .NET.
dotnet new console
dotnet run
using System;
using System.IO;
using System.Net.Http;
using System.Security.Cryptography;
using System.Text;
using System.Text.Json;
using System.Collections.Generic;
using System.Linq;

class Program
{
    const string APP_ID = "your_app_id";
    const string API_KEY = "your_api_key";
    const string API_SECRET = "your_api_secret";
    const string IMAGE_PATH = "test.jpg";
    const string API_HOST = "https://cn1-crs.easyar.com";

    static string Sha256(string s)
    {
        return Convert.ToHexString(
            SHA256.HashData(Encoding.UTF8.GetBytes(s))
        ).ToLower();
    }

    static void Main()
    {
        var imageB64 = Convert.ToBase64String(File.ReadAllBytes(IMAGE_PATH));
        var timestamp = DateTimeOffset.UtcNow.ToUnixTimeMilliseconds();

        var sign = new SortedDictionary<string, string> {
            ["image"] = imageB64,
            ["name"] = "demo_target",
            ["size"] = "20",
            ["type"] = "ImageTarget",
            ["timestamp"] = timestamp.ToString(),
            ["appId"] = APP_ID,
            ["apiKey"] = API_KEY
        };

        var builder = string.Concat(sign.Select(p => p.Key + p.Value)) + API_SECRET;
        sign["signature"] = Sha256(builder);

        var json = JsonSerializer.Serialize(sign);
        var client = new HttpClient();

        var resp = client.PostAsync(
            API_HOST + "/targets",
            new StringContent(json, Encoding.UTF8, "application/json")
        ).Result;

        Console.WriteLine(resp.Content.ReadAsStringAsync().Result);
    }
}
- Lingkungan runtime
- Unity 2020 LTS atau versi lebih baru
- Scripting Backend: Mono atau IL2CPP keduanya dapat digunakan
- API Compatibility Level: .NET Standard 2.1 (direkomendasikan)
Step 1: Menyiapkan file gambar
- Buat direktori di proyek Unity:
Assets/
└── StreamingAssets/
|    └── target.jpg
└── Scripts/
     └── CreateImageTarget.cs
- Sesuai nama direktori Assets
- Buat script CreateImageTarget.cs dan salin kode contoh di bawah
- Siapkan gambar uji target gambar
using System;
using System.IO;
using System.Text;
using UnityEngine;
using UnityEngine.Networking;
using System.Collections;

public class CreateImageTarget : MonoBehaviour
{
    [Header("Config")]
    public string apiUrl = "https://Your-Server-end-URL" + "/targets";
    public string authorizationToken = "YOUR API KEY AUTH TOKEN";
    public string imageFilePath = "target.jpg";   // StreamingAssets
    public string crsAppId = "<Your-CRS-AppId>";

    private void Start()
    {
        StartCoroutine(CreateTarget());
    }

    private IEnumerator CreateTarget()
    {
        // Read image file(Unity StreamingAssets)
        string fullPath = Path.Combine(Application.streamingAssetsPath, imageFilePath);

        if (!File.Exists(fullPath))
        {
            Debug.LogError($"Image file not found: {fullPath}");
            yield break;
        }

        byte[] imageBytes = File.ReadAllBytes(fullPath);
        string imageBase64 = Convert.ToBase64String(imageBytes);

        TargetRequestBody body = new TargetRequestBody
        {
            appId = crsAppId,
            image = imageBase64,
            active = "1",
            name = "unity_target",
            size = "20",
            meta = "created from unity",
            type = "ImageTarget",
            allowSimilar = "1"
        };

        string json = JsonUtility.ToJson(body);

        // UnityWebRequest
        UnityWebRequest request = new UnityWebRequest(apiUrl, "POST");
        byte[] jsonBytes = Encoding.UTF8.GetBytes(json);

        request.uploadHandler = new UploadHandlerRaw(jsonBytes);
        request.downloadHandler = new DownloadHandlerBuffer();
        request.SetRequestHeader("Content-Type", "application/json");
        request.SetRequestHeader("Authorization", authorizationToken);

        yield return request.SendWebRequest();

        if (request.result == UnityWebRequest.Result.Success)
        {
            Debug.Log("Create target success:");
            Debug.Log(request.downloadHandler.text);
        }
        else
        {
            Debug.LogError("Create target failed:");
            Debug.LogError(request.error);
            Debug.LogError(request.downloadHandler.text);
        }
    }

    [Serializable]
    private class TargetRequestBody
    {
        public string appId;
        public string image;
        public string active;
        public string name;
        public string size;
        public string meta;
        public string type;
        public string allowSimilar;
    }
}
- Di Unity Editor:
- Buat GameObject kosong
- Beri nama TargetUploader
- Seret script CreateImageTarget ke objek tersebut
Step 3: Mengonfigurasi parameter (Inspector)
Step 4: Jalankan
- Klik Play
- Lihat hasil di Console:
- Berhasil: mengembalikan JSON (berisi targetId)
- Gagal: HTTP / informasi error