On-site verification and diagnostics tool
This article describes localization settings, the runtime interface, and how to report abnormal data in Mega Toolbox (Mini Program). Use a mask file to verify the alignment of the model with the real environment, or load annotation data to inspect virtual content placement.
Before you begin
- Follow Tool introduction to prepare the cloud localization database, EasyAR account, and test phone, then go to the target Block's site.
- To use a mask file, the Block mapping version must be 9.6 or later. Check it on the Block details page.
- To use annotation data, first create annotation data for on-site verification and confirm that the package belongs to the database you will test. Skip this step if you will not use annotations.
For a complete example, see Mini Program running result.
Get the tool
Scan the Mini Program code below with WeChat to open Mega Toolbox (Mini Program).

Log in
Use an EasyAR Developer Center account that can access the target cloud localization database. The numbered items in the image show the username, password, and login button.
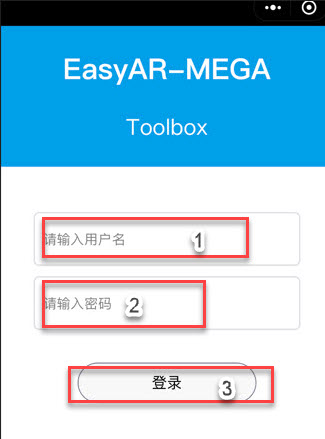
- Enter your username.
- Enter your password.
- Click
Log in.
Select the localization database and annotation data
Select the target cloud localization database, optionally select an annotation data package, and click Start. The settings in the image are explained below.
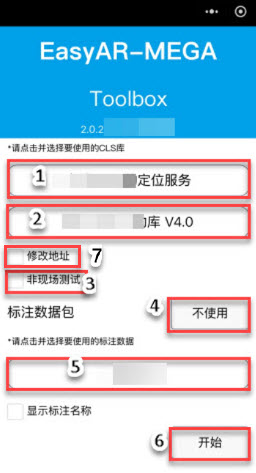
| No. | Setting | Description |
|---|---|---|
| 1 | Cloud localization database | Select the database containing the target Block. The list displays "service group name | database name". |
| 2 | Modify address |
Usually leave unchecked. If you need another service address, such as an overseas service, configure it as required. |
| 3 | Off-site test |
Leave unchecked when testing in the real environment; check only for off-site tests with photos or similar material. |
| 4 | Cold-start test |
Used for dedicated cold-start testing. Leave unchecked for routine on-site verification. |
| 5 | Annotation data package | Select the package to load. To verify localization or display a mask file only, select Do not use annotations. |
| 6 | Show annotation names |
When loading annotations, check as needed to show their names. |
| 7 | Start |
Open the localization page with the current settings. |
When entering the localization page for the first time, grant camera and location permissions as prompted by WeChat.
Enter the localization interface
Point the phone camera at a well-lit area with rich visual texture and move it steadily until WeChat plane detection initializes. Keep Mega localization enabled and wait for the cloud localization result.
View localization results and controls
Turn on Debug information to see device, scene, request, and localization results. The image shows the interface after successful localization with annotation data loaded. If no annotation data is used, the annotated cube is absent.
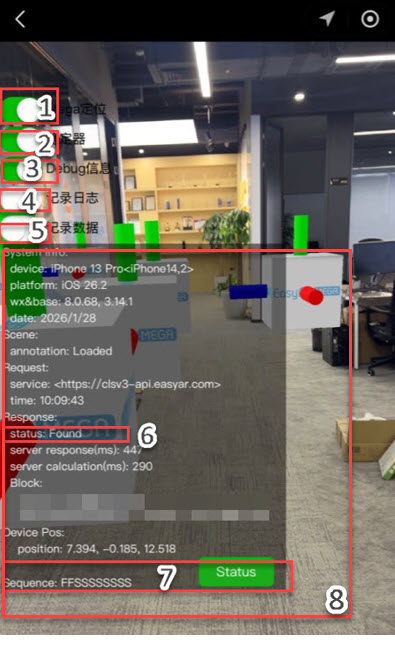
| No. | Control or information | Description |
|---|---|---|
| 1 | Debug information |
Show or hide the debug information panel. |
| 2 | Record logs |
Start or stop recording runtime logs. After stopping, choose a recipient in the WeChat sharing interface to export the file. |
| 3 | Record data |
Start or stop recording dump data. After stopping, choose a recipient in the WeChat sharing interface to export the file. |
| 4 | Advanced options |
Show or hide advanced options. |
| 5 | Mega localization |
Start or stop Mega cloud localization. |
| 6 | Cloud localization result | View status, request response time, and the localized Block. |
| 7 | Localization history | Sequence shows previous states: N means not loaded, S means localized, and F means localization failed. The Status button is green for success and white for failure. |
Common results and what to do:
| Result | Meaning and action |
|---|---|
Found |
The target Block was localized. Compare the mask mesh or annotations with the real scene to check alignment. |
Not Found |
This request did not find the target Block. Check that you are on site, the Block is in the database, and the camera points at a visually textured area. If this continues, see Troubleshoot localization failures. |
QpsLimitExceeded |
The request exceeds the cloud localization service group's QPS quota. See QPS estimation and expansion to check usage or expand capacity. |
UnKnownError |
This may involve network connectivity, data transfer, or service response. Follow Troubleshoot localization failures first, then record logs and data if needed. |
Display the mask file
After successfully localizing a Block that supports mask files, turn on Mask file. The Mini Program automatically loads and displays its mask mesh; you do not need to download it or create annotations.
| No. | Control | Description |
|---|---|---|
| 8 | Mask file |
Show or hide the mask mesh. |
| 9 | Opacity slider | Adjust mask mesh opacity from 0% to 100% to compare it with the real camera image. |
The ground and vertical surfaces are shown in different colors, and the mesh occludes itself. Check the alignment of walls, floors, seams, and corners, and watch for jitter or drift as you move the phone. For an example, see Mask file.
If the mask mesh does not appear, confirm that the target Block was localized, its mapping version meets the requirement, the switch is on, and opacity is above 0%. Then wait for the resource to load.
View annotation results
If you selected an annotation package before starting, you can view its content in the real scene after localization. Annotated cubes show a white MEGA texture when localization succeeds and gray when it fails.
Compare annotations with the positions chosen when creating them. Distinguish localization failure from jitter or drift after localization; for the latter, see Abnormal tracking behavior.
Report abnormal localization data
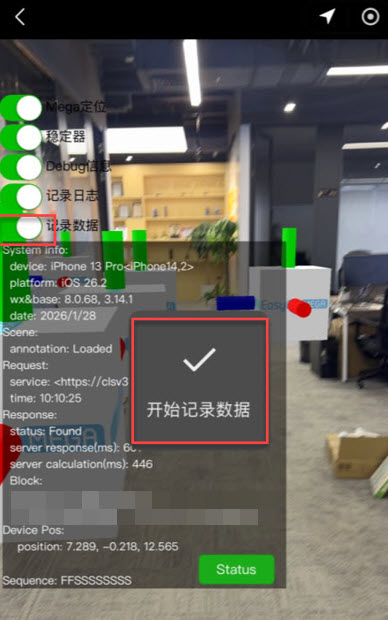
If localization fails, has an offset, jitters, or drifts, record both logs and dump data while reproducing the problem. You must choose a recipient manually when sharing the files.
On the localization page, turn on
Record logsandRecord data. Confirm recording has started and reproduce the problem.After reproducing the problem, turn off
Record datato stop recording.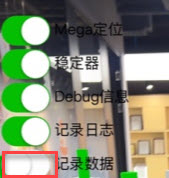
In the WeChat sharing interface, select
File Transfer Assistantand save the data file.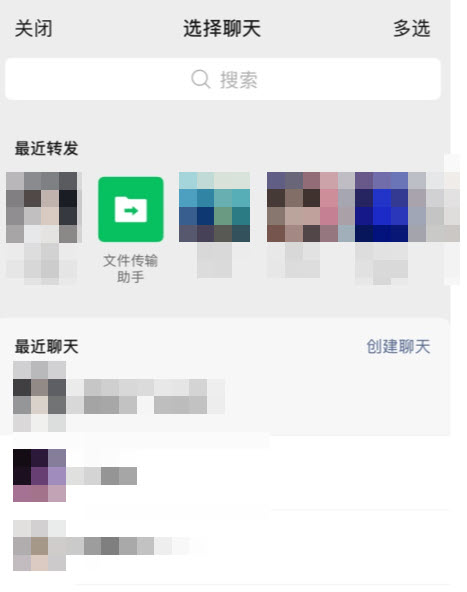
Return to the localization page and turn off
Record logs. Save the log file through the WeChat sharing interface as well. Finish recording and exporting before leaving the localization page.Give EasyAR technical support the data file, log file, and a description of the problem. Include the cloud localization database and Block, test time, phone model, system and WeChat versions, symptoms, and reproduction steps. Screenshots or recordings can help.
For details on recording and exporting dump data, see Record dump files with Mega Toolbox (Mini Program).