微信小程序 Mega 插件示例工程說明
這篇文章詳細說明了示例工程展示的各功能使用方法,實現方式與注意事項。
開始之前
- 能夠使用 Unity 編輯器建立並上傳標注,並記錄標注名稱與其 ID。
- 能夠使用 Unity 編輯器建立與實景對齊的 3D 內容。
- 能夠完整運行示例工程。
如何在標注位置展示模型
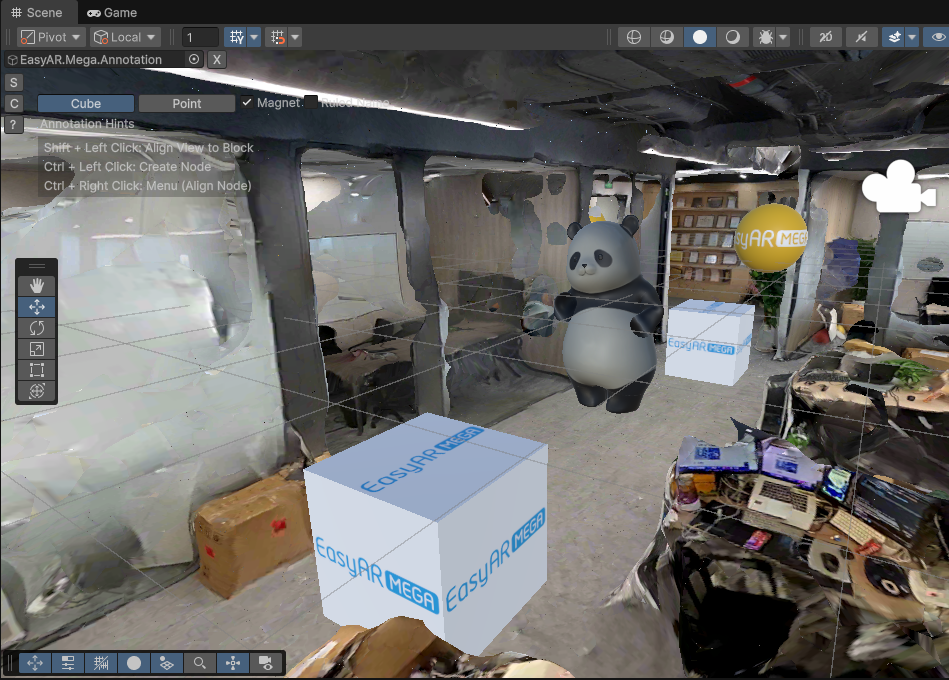
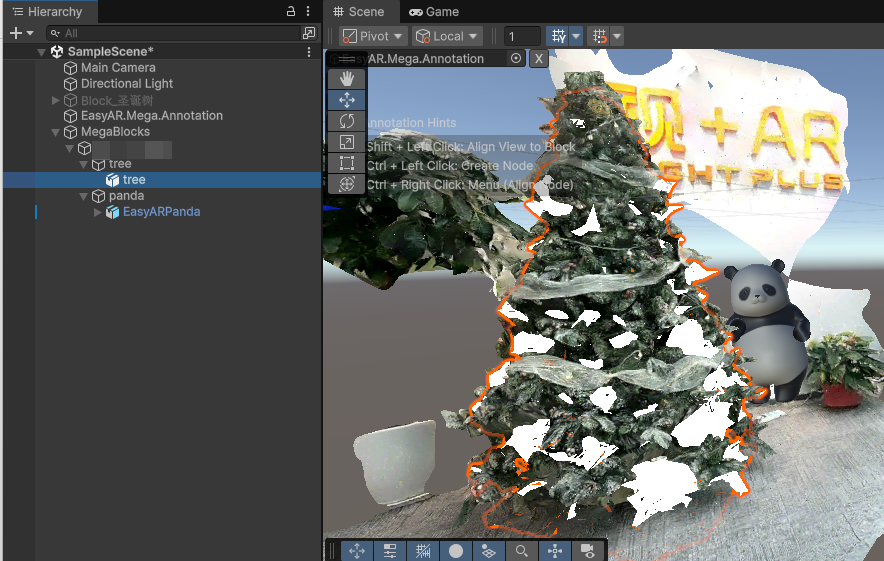
在 Unity 編輯器中精確擺放並上傳標註,記錄標註名稱與其 ID
添加 GLTF 模型資源
在
miniprogram/components/sample-easyar-mega/index.ts中的sampleAssets中添加模型資源。const sampleAssets = { your_model_name: { assetId: "your_model_asset_id", type: "gltf", src: "url/model.glb", options: {} } }加載添加的模型資源
在
miniprogram/components/sample-easyar-mega/index.ts中的loadAsset()函數中加載模型。async loadAsset() { try { await scene.assets.loadAsset(sampleAssets.your_model_name); } catch (err) { console.error(`Failed to load assets: ${err.message}`); } }配置要替換的標註
在
miniprogram/components/sample-data/annotation-metadata.ts中配置要替換的標註,如果要替換多個則用逗號隔開。export const AnnotationMetaData: Record<string, any> = { "aaaaaaaa-bbbb-cccc-dddd-123456789012": { assetId: "panda", scale: "0.5 0.5 0.5" }, "aaaaaaaa-bbbb-cccc-dddd-123456789013": { assetId: "your_model_asset_id", scale: "1 1 1" } };替換標註加載模型
在 EMA 加載的回調中使用 xr-frame 的「工廠方法」
scene.createElement(xrFrameSystem.XRGLTF, options)創建模型節點。參數:
xrFrameSystem.XRGLTF:指定創建的元素類型為 GLTF 模型。options:初始化配置項,對應元件的屬性。
代碼中的關鍵屬性:
"model":必填,指向已加載的資源 ID(asset-id)。"anim-autoplay":選填,指定加載後自動播放的動畫名稱。"scale": 選填,assetInfo.scale或 "1 1 1"。name: 必填,標註名稱。
注意
注意區分屬性 Key 的字串和非字串,完全按照示例中的方式填寫。
將模型掛載到標註節點下
xrNode.addChild(child)。為了保證 GLTF 模型在不同平台的加載器下看到一樣的結果,需要對加載後的模型原地繞 Y 軸旋轉 180 度。
if (assetInfo && assetInfo.assetId && assetInfo.assetId.trim().length > 0) {
    model = scene.createElement(
        xrFrameSystem.XRGLTF,
        {
            /** 即前一步驟中的 assetId */
            "model": assetInfo.assetId,
            /** 可以在此處指定播放的模型動畫 */
            "anim-autoplay": assetInfo.animation ? assetInfo.animation : "",
            "scale": assetInfo.scale ? assetInfo.scale : "1 1 1",
            name: emaName
        }
    );
    xrNode.addChild(model);
    /**
     * 由於 GLTF 加載器的行為不同,為了保證模型在 xr-frame 上的朝向 與 Unity 的渲染結果完全一致
     * 需要對加載後的模型原地繞 Y 軸旋轉 180 度
     */
    let modelTransform = model.getComponent(xrFrameSystem.Transform);
    let currentRotation = modelTransform.quaternion.clone();
    let targetRotation = currentRotation.multiply(new xrFrameSystem.Quaternion().setValue(0, 1, 0, 0));
    modelTransform.quaternion.set(targetRotation);
}
實機運行
實機運行的結果如下,可以與第 1 步中 Unity 編輯器上的位置進行比照:
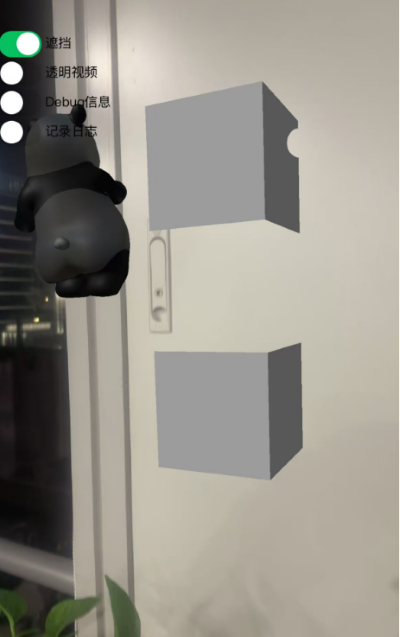
打開左側透明視頻按鈕,世界坐標系原點(坐標為
(0, 0, 0)的位置)出現透明視頻材質的方塊。附註
原點位置可能是隨機在空間中的任意位置。可以利用標註將遮擋模型放置到您希望的位置,詳見使用 Unity 編輯器創建並上傳標註。
打開左側遮擋按鈕,世界坐標系原點(坐標為
(0, 0, 0)的位置)出現熊貓模型和上下層疊的方塊,中間的方塊具有遮擋材質,另一側有一個帶有遮擋材質的靜態熊貓模型。附註
原點位置可能是隨機在空間中的任意位置。可以利用標註將遮擋模型放置到您希望的位置,詳見使用 Unity 編輯器創建並上傳標註。
如何將透明影片在標注位置播放
載入類型為
video-texture的影片資源。async loadAsset() { const videoTexture = { assetId: "fireball", type: "video-texture", // 影片資源 URL src: "url/video-resource.mp4", options: { autoPlay: true, loop: true, } }; try { // 載入 video-texture 類型資源 await scene.assets.loadAsset(videoTexture); } catch (err) { console.error(`Failed to load video texture: ${err.message}`); } }修改 ema 載入回調
在 ema 載入的回調中使用
scene.createElement(xrFrameSystem.XRMesh,options)建立簡單的幾何體賦予easyar-video-tsbs材質, 並修改uniform為u_baseColorMap:video-{$assetId}。參數:
xrFrameSystem.XRMesh:指定建立的元素類型為基礎幾何體。options:初始化配置項,對應元件的屬性。
程式碼中的關鍵屬性:
"geometry": "cube":使用 xr-frame 內建的立方體幾何資料。"material": "easyar-video-tsbs":指定一個預定義的材質(根據命名推測,這是一個支援影片紋理的特殊材質)。"uniforms": "u_baseColorMap:video-{$assetId}":
注意
注意區分屬性 Key 的字串和非字串,完全按照範例中的方式填寫。
這是材質參數的動態綁定。
它將名為
video-{$assetId}的影片資源(紋理)映射到了材質的基色圖上。效果:這會產生一個表面正在播放影片的立方體。
model = scene.createElement(xrFrameSystem.XRMesh, {
    geometry: "cube",
    material: "easyar-video-tsbs",
    uniforms: "u_baseColorMap:video-fireball",
});
xrNode.addChild(model);
附註
在使用
video-texture時,若控制台出現wx.createVideoDecoder with type: 'wemedia' is deprecated警告,請忽略。經與微信官方團隊確認,該警告不影響使用。
實機執行
如何擺放與空間對齊的遮擋模型
精確擺放用於遮擋的模型並上傳標註。
在 xr-frame 小程序中加載作為遮擋的 GLTF。
透過
scene.assets.loadAsset()加載模型資源(需手動卸載)。const sampleAssets = { occlusion1: { assetId: "occlusion1", type: "gltf", src: "url/occlusion1.glb", options: {} } } async loadAsset() { if (!scene) {console.error("Empty scene"); return;} try { await scene.assets.loadAsset(sampleAssets.occlusion1); } catch (err) { console.error(`Failed to load assets: ${err.message}`); } }運行時在 EMA 加載回調中加載模型並賦予遮擋材質
在 EMA 加載的回調中使用
scene.createElement(xrFrameSystem.XRGLTF,options)創建模型節點。參數:
xrFrameSystem.XRGLTF:指定創建的元素類型為 GLTF 模型。options:初始化配置項,對應組件的屬性。
代碼中的關鍵屬性:
"model":必填,指向已加載的資源 ID(asset-id)。"scale": 選填assetInfo.scale或 "1 1 1"。name: 必填,標註名稱。
注意
注意區分屬性 Key 的字串和非字串,完全按照示例中的方式填寫。
將模型掛載到標註節點下
xrNode.addChild(child)。為保證 GLTF 模型在不同平台的加載器下看到一樣的結果,需對加載後的模型原地繞 Y 軸旋轉 180 度。
最終使用
model.getComponent(xrFrameSystem.GLTF).meshes.forEach((m: any) => {m.setData({ neverCull: true, material: occlusionMaterial });}修改 GLTF 模型的材質。附註
easyar-occulusion材質的加載,註冊,反註冊,卸載由 AR Session 控制。使用模型在標註位置作為遮擋:
if (...) {
    model = scene.createElement(
        xrFrameSystem.XRGLTF,
        {
            "model": assetInfo.assetId,
            "scale": assetInfo.scale ? assetInfo.scale : "1 1 1",
            name: emaName
        }
    );
    /**
    * 由於 GLTF 加載器的行為不同,為保證模型在 xr-frame 上的朝向 與 Unity 的渲染結果完全一致
    * 有時需要對加載後的模型原地繞 Y 軸旋轉 180 度
    */
    let modelTransform = model.getComponent(xrFrameSystem.Transform);
    let currentRotation = modelTransform.quaternion.clone();
    let targetRotation = currentRotation.multiply(new xrFrameSystem.Quaternion().setValue(0, 1, 0, 0));
    modelTransform.quaternion.set(targetRotation);
    //注意必須在修改 Transform 後修改材質
    if (assetInfo.assetId == 'occlusion1') {
        //獲取 mega 插件提供的遮擋材質
        let occlusionMaterial = scene.assets.getAsset("material", "easyar-occlusion");
        //修改遮擋材質
        model.getComponent(xrFrameSystem.GLTF).meshes.forEach((m: any) => {
            m.setData({ neverCull: true, material: occlusionMaterial });
        });
    }
}
實機運行
可與 Unity 編輯器上模擬運行的結果進行比照。